Showing posts with label Food. Show all posts

Monday, July 28, 2014

Pantry Organization

BEFORE

Making great use of waste to hold canned goods. Thinking that making coating the boxes with glue and covering with scrapbooking paper would add extra strength, I covered them in glue. But I never did add the scrapbooking paper. They work just fine for smaller cans like soup.

AFTER

The key was to put the things the kids get themselves like cereal down where they can reach them and the things they shouldn't be getting into like candy up higher where it is most difficult for them to reach.

Monday, December 2, 2013

Doll Cake

Many months ago, before my 7 year old turned 7, she suggested not so subtly that she would be thrilled if daddy made her a doll cake. It just so happened that a few years ago my husband's mother gave us a kit to make a doll cake. And with my hubby's cake decorating skills, here was what our daughter got on her birthday.

You've got to start with a cake base that looks something like this.

Then add some detail. He hates that I take "working" shots of him.


Add the rest of the skirt, and some "clothing" on top.


 Maybe a necklace and earrings too.

And bam! You have a cute doll cake. 

Saturday, November 30, 2013

Oreo Banana Split Bites

I want to share the love with these amazing yummy treats. You can find the recipe here. I made these for my 7 year old's classroom birthday celebration. 

A few helpful tips: 
I thought one package of Oreos would be enough for a class of 17, nope, I needed 2 packages which led to another trip to town just to buy more Oreos. So save a trip and just buy at least 2 to begin with.

We ran out of white chocolate, so we used milk chocolate for about 1/2 of them. They turned out cute too.

If you can only handle a little bit of sweet, you will probably only be able to eat 1/2 of these. They are very very sweet. Good, but sweet.

If you don't want to use nuts, don't use them. We didn't and they were still tasty.

If you plan to take them to school, I suggest bringing a package of wipes for the kids. The teacher said they came in very handy when all the 1st graders had chocolate hands and faces.

Triple layer Neapolitan Oreos. I didn't even know they made these! Split in 1/2 with a banana slice in between.

Little helper, she was so good about helping. She will be a great little chef one day. =)

This is the before-the-drizzle shot. 


Ready to take to school.


Here are the mild chocolate ones. They look just as cute!

Monday, October 21, 2013

APPLE DAY

Its FALL and for me that means apple time. I am so blessed to have people around me who have such an abundance of apples that they were willing to share. I also have a couple friends who wanted to get together to make all kinds of apple goodies. Although my recipes aren't original, I wanted to share the links to them because they were so stinking amazing!

So we started out with 2 bathtubs full of apples. It made me laugh, but we had so many the best way to clean them was in the bathtub! =)

Then we used a nifty little gadget called an apple peeler corer slicer. If you want to do apples and don't have this thing, go get one. It makes apple life so much easier!
Yes, my hubby and my brother joined in.

Next we peeled, and sliced, and cored.

Finally, we peeled, and sliced, and cored some more. Seriously thought it would never end. My sweet husband kept peeling, slicing and coring so that the three of us could start making some yummy apple goodies.

We started with apple butter in 5 crockpots sitting throughout the house. This was interesting with 5 kids, 3 adult men, and 3 adult women to get around. But we managed and it was so worth it! So, so yummy! Here is the link for the recipe we used.

Next we went to making applesauce. This was very easy and again, so tasty. We didn't even add any sugar or spices it was so good plain. Here is what we used for the applesauce recipe.

We also made apple chips by simply slicing and dehydrating at 140 degree for 12-24 hours. You can make them as crunchy or soft as you like. We also sprinkled cinnamon and sugar on them before dehydrating.

Silly me, I didn't get a picture of these, but we also made simple canned apple rings, spiced apple rings, and cran-apple jam.

I wanted to make canned apple pie filling, but after reading that it wasn't safe to use cornstarch in canning products, and I didn't have time to order the stuff I really needed, we settled for canned apple rings which are easy enough to add the apple pie spices for a pie.

And, finally, here is what we ended up with. We used so many jars, I have no more left-which is a good thing. =)

Happy Canning!

Monday, September 16, 2013

Non-alchocolic Mint Julep Recipe

We had an amazing trip over the summer. While on the trip we were able to go to Disneyland. This was my children's first trip there. It was so amazing to see the excitement in their eyes. It was great!

The Sword in the Stone is one of my husband's favorite Disney movies, so I knew we had to get a kid pic to send to him since he couldn't go with us. 

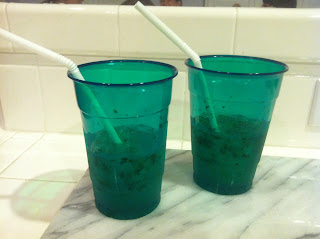
While there, we were able to have a variety of great food. One day we decided to eat in New Orleans square. My younger brother decided to be daring and try this drink called a Mint Julep, and I'm so glad he did. It was so good we all enjoyed. When we got back to my mom's house in Las Vegas we decided to figure out to make it. We found this recipe. We got all the ingredients except the creme de menthe syrup. We could not find it anywhere. My mom and I, the complete non-alchocolic drinkers we are decided to try to track it down in a liquor store since that is where is suggests to find it. We went to 3 different stores over about a week asking for it and no one had it. This is Vegas people! If we can't find it in Vegas, where in the world could you possibly find it? Finally at the last place we tried the salesperson suggested we try Whole Foods. Unfortunately, we still didn't find creme de menthe, but we did find a previous bartender who worked there. She knew exactly what to do to make the stuff. As she begin explaining, she suggested looking for this liquid called Mint Infused Simple Syrup. Low and behold, they actually had that. 


On one of the few remaining days we had in Vegas, we finally had a way to make it. We had to tweet the original recipe and this is what we ended up with: Still so yummy even if it is not the exact same as the one we had at Disneyland.

Revised Mint Julep (non-alchocolic) 
3/4 Cup Mint Infused Simple Syrup
1 1/4 oz lime juice concentrate
8 1/2 oz lemonade concentrate
5-8 cups of chilled water
1/2 .75 oz (21.3 g) of finely chopped mint leaves

Mix simple syrup, lime juice, and lemonade concentrate together. This makes 2 cups of syrup. Add 5-8 cups of chilled water to the syrup.* Lastly, add the mint leaves.** Serve over crushed ice.

Possible garnishes: Cherry, Lime slice, Lemon slice, Mint leaves
* If you like your drinks to have strong flavors add 5 cups of water, if you like your drinks a little diluted add 7 or 8 cups of water. If you aren't sure, start with 5 cups. You can always add more if needed. 
** We just added the mint leaves directly to the drink. It made the mint taste stronger which we liked. However, if you don't feel like drinking the chopped mint leaves, you could add whole mint leaves in the drink and take them out before you drink it. 


Now that we have arrived back home, I am finding it near impossible to find Mint Infused Simple Syrup. Looks like I'll have to hit up the liquor stores near me! (Anyone who knows me knows how ridiculous this phrase sounds coming from me as I know nothing of alcohol. =) )

Monday, June 17, 2013

College Care Package

I have a cousin in college and all that I see from her on Facebook is how she is hungry and has nothing but plain oatmeal. That's when I got an idea to send her a care package with some food and other useful supplies. Each item or set of items had a cute little saying on it. That of course is totally optional, but it made it more fun to put together. It worked out great!

The first thing you will need is a huge box. I had to leave out one thing because I didn't have enough room in the box and it was the biggest box I had!

Then you should raid the dollar store and Walmart or your choice of stores. 

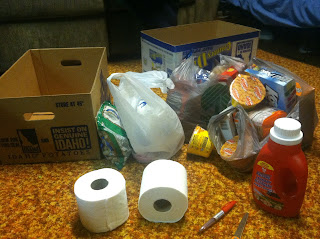
Here's all my stuff:


And the list of items with some cutesy sayings:

Fiddle Faddle- Don't fiddle away your time
Bear cookies- For when you need a bear hug
Microwavable mac and cheese bowls- So you have something to eat besides oatmeal
Honey Nut Scooters cereal- To help you scoot your way through school
Kool Pops- Be cool stay in school (haha!!!! so corny, but hilarious)
Top Ramen- So you can be at the top of your class
Raisins, cinnamon, brown sugar- Something for the boring oatmeal
Various chocolate bars- For the chocolate lover in us all
Red Vines- To climb the vine of success
Pretzels- (I can't remember this one- something about a knot, maybe?)
Peanuts- Sometimes you just feel like a nut
Dryer sheets, laundry soap, toilet paper- To keep fresh for the boys (I called the post office to see if I could mail liquid laundry detergent, they said yes as long as it was in a sealed container-as in a twist type cap- and it was packed with something that would soak up the liquid if it leaked-hence the toilet paper. I also tied it in a plastic bag to help if it leaked. But, it got there just fine. I suggest you call your local post office to double check if you choose to send something liquid.)


Sunday, June 16, 2013

Red Hat Cake

About a month ago, my husband and I ventured into cake decorating. Our first official cake for someone else was a graduation cake you can find here.

From that first cake we got another request for a couple of weeks later. From a couple of inspiration pictures the "clients" (They were really just good friends, not really clients, but it sounds professional!) provided I sketched a design and off we went. I was much more hands on with this project than the previous one. 

Here is one inspirational pic. Here is the other one.

To start we made strips for the large bow they wanted. Originally we had purple and red fondant for the bows. We also made hats by cutting circles and pushing them into mini muffin tins to create the top of the hats. 

Next we made the cake. We used the same zebra style cake. You can find the recipe here. This time we used red and white. We wanted to try red and purple, but were too afraid that the colors would bleed together and it would be a brownish yuck color. We had to cut one of the cakes in half and found this heart in the center. How cool is that!?

We had to use trial and error with the bow. The red and purple strips were too long and would not stand up. We also tried using candy melts as an anchor for the strips. Not good. It did not work and the purple strips broke and it just looked terrible. We ended up doing a solid red bow and using royal icing to attach all the strips. The tissue you see in the pictures helps the fondant dry in the right form. 
On the hats we made feathers, roses, flowers, and bows. 


We added some frills to the sides. Then we painted them with pearl dust for a little shine. Yes, that was a pain, but it was worth it. It gave a very subtle sheen on the flourishes.


It looks pretty plain, huh? Not for long.

We added pearls intertwined in the bow... one at a time... by hand... with tweezers... and royal icing for glue. Picture this: Round little pearl candies being forced into small tweezers and pushed into a small space. About every other one would fly out of the tweezers and land all over the table. We were chasing little candies around and trying to avoid messing up the cake at the same time. It took a very long time and tons of patience.


Then we added the pearls to the rest of the cake. This is the front view of the bow and pearls.

And the back view of bow and pearls.

Then we added the hats.


It was a great party and fun to celebrate our good friend's birthday. It was even more special to see the look on her face when we delivered that cake. Good times! Hopefully we will be able to do more cakes at some point. I think I'm hooked!!!


Wednesday, May 22, 2013

Graduation Time

With the end of the year here it is now time to celebrate with all the graduates. We have a good family friend whose daughter graduated high school this year. We ended up making her graduation cake and I am here today to show you the process and the finished product.

My hubby's grandmother made and decorated cakes for years and apparently she passed down her talent to my husband. He has always liked to pretend to decorate cakes for all our birthdays, but when this opportunity came up for him to make a cake for someone else, he jumped all over it.

I'm not going to lie, I was pretty nervous because he has never made a "professional" type cake before. But it all turned out great and the mother and graduate were happy with the final product.

I don't know the actual terms, but these are a few that my husband or I have heard throughout the years. So pardon my non-cake terminology.

They wanted a swirl cake, but after trying several different methods, we just couldn't get it right. So we ended up doing a zebra cake which gave us much better results. Here is the link to the recipe and directions for the actual cake.

Because he had never used fondant for embellishments (we used it for the flowers) we had fun experimenting with various patterns and tools. That was my job, the flowers.

Crumb coating it. Hubs had never done this before, but it helped to create a hardened layer that would not lift up the cake when he tried to frost it.

They didn't want fondant, which is good, because the hubby is used to playing around with buttercream frosting. 

Making it all smooth.

Starting the decorations. Here is the picture he was working from.

Adding the finishing touches. 
 
And the completed cake. This sucker was heavy!!! And to top it off, my husband hurt his back, so guess who got to lift this thing in and out of the fridge and the car for delivery? 

It was fun to help out, but I wish my husband would stop saying that WE have to start on the next cake. This is HIS thing, not mine! Ha! I'll post those pics of that one too when we are done.