Showing posts with label Young Women. Show all posts

Monday, June 17, 2013

College Care Package

I have a cousin in college and all that I see from her on Facebook is how she is hungry and has nothing but plain oatmeal. That's when I got an idea to send her a care package with some food and other useful supplies. Each item or set of items had a cute little saying on it. That of course is totally optional, but it made it more fun to put together. It worked out great!

The first thing you will need is a huge box. I had to leave out one thing because I didn't have enough room in the box and it was the biggest box I had!

Then you should raid the dollar store and Walmart or your choice of stores. 

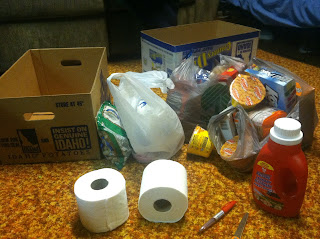
Here's all my stuff:


And the list of items with some cutesy sayings:

Fiddle Faddle- Don't fiddle away your time
Bear cookies- For when you need a bear hug
Microwavable mac and cheese bowls- So you have something to eat besides oatmeal
Honey Nut Scooters cereal- To help you scoot your way through school
Kool Pops- Be cool stay in school (haha!!!! so corny, but hilarious)
Top Ramen- So you can be at the top of your class
Raisins, cinnamon, brown sugar- Something for the boring oatmeal
Various chocolate bars- For the chocolate lover in us all
Red Vines- To climb the vine of success
Pretzels- (I can't remember this one- something about a knot, maybe?)
Peanuts- Sometimes you just feel like a nut
Dryer sheets, laundry soap, toilet paper- To keep fresh for the boys (I called the post office to see if I could mail liquid laundry detergent, they said yes as long as it was in a sealed container-as in a twist type cap- and it was packed with something that would soak up the liquid if it leaked-hence the toilet paper. I also tied it in a plastic bag to help if it leaked. But, it got there just fine. I suggest you call your local post office to double check if you choose to send something liquid.)


Sunday, May 26, 2013

YW Revelation Lesson

I'm so lucky! I get to teach young women (YW) for a few weeks in a row this summer because of vacations and such. Don't worry, the other councilors will make up for it when I go on vacation.

For the last lesson in May, I decided to choose the one on personal revelation. You can find it here.

Whenever I plan a lesson for YW I read through the lesson and then see what fun and cute ideas that others have come up with. I enjoy looking and reading other people experiences because it is one way that helps guide me to what exactly the girls need. Then I like to make it my own by adding something to it.

I usually go to Sugardoodle first and that is where I found this cute idea. That is when I came up with a theme for the lesson. I don't usually do "themes" but I felt really good about this one. It focuses on the idea that there is a recipe to receive personal revelation. Throughout the lesson by incorporating the ideas that are provided within the lesson itself, we will learn what that recipe is.

I will start the lesson off with the thought that if you don't follow the recipe you won't get what you want in the end. A cake that has too little sugar. Cookies that have too much salt. Bread without the yeast. You get the idea. Throughout the lesson we will come to realize that in order to receive personal revelation it is important to have faith, study the scriptures, pray, obey, and be meek and humble. Without those items, it will be hard to get the answer you want in the end.

I changed the handout from the candy corn to popcorn balls. I made some popcorn balls that will be part of the table set up and will be given to each of the girls at the end with the recipe for the popcorn balls and the recipe card for personal revelation.


Hopefully the girls will love it too.

Monday, March 18, 2013

Stand in Holy Places Necklace

At church there are three people who work with the teenage girls. One works specifically with the 12-13 year olds, one the 14-15 year olds, and one the 16-18 year olds. The three of us work together to try to create the best for all of the girls. We think that a teenage girl's birthday is pretty special, and we decided that these were too good to not give all the girls.  Me being, or should I say pretending to be, crafty thought this would be easy enough to make. It was pretty simple, and they did turn out great! 

This idea comes from The Idea Door. She posted all the links which made it very easy to find and order all the materials. But there were no directions. I feel comfortable enough to put these together without directions, but for those who like or need step by step, here ya go. These are easily adaptable to create any kind of necklace you would like.

The materials: 
  • A charm. I got these Salt Lake Temple charms from Charming LDS Gifts.
  • Split rings. You can find these at any craft store with a jewelry section. I got mine from Wal-mart.
  • Quote or picture printed on photo paper. I downloaded the 2013 Mutual theme scripture from The Idea Door.
  • Clear epoxy stickers.
  • Ball Chain.
  • Bottle Caps. I bought the epoxy stickers, ball chain, and bottle caps from Fizzy Pops on Etsy. They came as an entire kit which was very convenient. 
  • Glass Pearls. You can get these in a jewelry section. I got mine from Wal-mart. They came in a string with large beads, small beads, and silver beads.
  • Head and eye pins. I got mine at Wal-mart.
  • Needle nose pliers. Unless you have a jewelry making tool that works better than needle nose pliers. 
  • Double sided tape.

Once everything came I was so ready to get started. I made these while my husband and I watched a movie. 
Here is the charm. The hole was too small for the ball chain, so I had to use split rings.


These are the rings that usually go on key chains. You have to open one side and slide the key on. Then you have to twist the key and the ring in opposite directions to the the key securely on the ring. These are just a smaller version of the key ring. 

This was probably the hardest part. These little buggers were so stinking small. I struggled to figure out a way to get the charm onto the split ring. But once I found a way, it worked like a charm. =) My nails are not that strong and are not very long, but that is what I used for this part. I stuck my thumb nail in the middle of the ring toward the end of opening.

 Then, I slid the charm on using pressure from my thumb and my other hand holding the charm to get the charm started on the ring. It sounds more complicated than it sounds.

This is where needle nose pliers come in handy. Use them to twist the ring around until the charm is completely hooked onto the split ring. 

Ta-da!

I didn't get a picture of the quotes before I stuck the epoxy stickers on it and started cutting. But you get the idea. I printed these on my own printer on some old photo paper I had. If you have the resources, I would suggest getting these printed at a photo place. These turned out great, but they could have been more black and printed on better paper. 

I didn't have the right size circle punch so I put the stickers on over the quote and cut them out around the stickers. 

The bottle caps came with split rings already attached thanks to the entire kit I got for the bottle caps, ball chain, and stickers. 

I used regular Elmer's glue to attach the quote to the bottle caps. I highly suggest NOT doing this. It turned the black on the quote a different color (grayish-blue) and it didn't really even keep the quote attached. My suggestions would be to try either strong scrapbooking tape or regular double sided tape. If you try it, let me know what worked best for you.

Making progress!

I didn't get a picture of the string of beads before I took them apart, but there were large beads, small beads, and silver beads. The original had caps that were pretty cute, and I did see them at Wal-mart, but opted to use these instead.

These are the head and eye pins I used. I have to be honest, I had no clue what these were until I looked for them in the jewelry section.

There are two different types of pins in this package. Flat headed ones, and eye hole ones. I used the flat head ones because they fit the best with the beads I was using. Either one would look good.

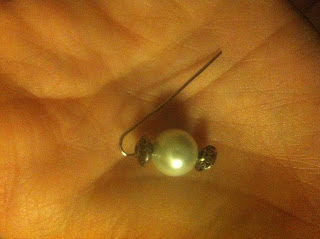
These are the beads I decided to use: the large bead and two silver ones.

On a flat head pin put the silver bead, the big bead, and then another silver one. Or whatever combo you like.

Slide the beads all the way down and create a hook . You are beginning to create a circle that you will hold the beads to the ball chain. It looks like a fish hook earring. I did use the needle nose pliers for this part too. It made it very easy.

Finish your circle, making sure that your "eye" is big enough to put on your ball chain.

Wrap the remainder of the pin around the bottom of the "eye" circle you made.

Another part finished!

The last step is the best one! Slide all of your elements onto your ball chain and relish in the fact that you made it. Or if you are making these for a crowd, that you finished them all! 

I hope the girls like them and they are a reminder to stand for what they believe in.
Friday, March 15, 2013

YW Challenges

For those who are looking for young women teaching ideas, here is how our branch does our lessons to go with the new curriculum.

Because the curriculum is so focused on living the principles taught and really getting it in the girls' lives and out in the world, we wanted to really incorporate a weekly challenge that had to do with each week's lesson.

We bought hooks that are attached to suction cups so the girls could hang their weekly challenge on the hooks. We asked the girls to put the hooks on their mirror at home so that every time they looked in the mirror, they would see the challenge and hopefully be more likely to complete the it.

At the beginning of each lesson, we try (notice I say try, this is new for us too!) to ask the girls how their challenge went the previous week and how the concepts we talked about in the previous lesson helped them throughout the week.

So far, it is working well. At the beginning it was hard for the girls to get in the habit of taking the handouts/challenges out of their scripture bags, but I think it is going well now.

This challenge is for the March lessons on the Atonement. It goes with the signs I made here. I used the pattern from the bottom of the quote used that found here. I found the flourish by typing in "orange flourish" in a google search. I copied and pasted it into word and changed to color to match the striped pattern.


I want the girls to write a trial or two in their lives and then throughout the lesson come up with a way to overcome that challenge through the atonement of Christ. Throughout the week, they will hopefully see these and be able to overcome one of their own trials or at least begin to work towards overcoming a trial.

Easy Wood Signs

I like to make fun crafts for the girls I teach at church. When I came across these printables I knew I wanted to do more than print them off on paper. Then I remembered that I had wood squares that I have been saving for about 4 years to make garden stakes. These handouts are much cooler than the garden stakes that I probably would not get to for another several years. I got pretty excited about my idea, in fact, I got so excited I started right away. Here's what you need and how I created them.

Materials:
Acrylic paint- color of your choice
Paint brush
Wood- size of your choice
Design of your choice printed on computer paper
Mod Podge - or glue water
Sandpaper or sanding block
Polyurethane

My wood was cut into 4 inch x 4 inch pieces already, so that is the size I stuck with. I downloaded the printable I wanted. I copied and pasted it into Word and then resized it to 4 inch x 4 inch. Then printed them on regular white paper. Cut to the preferred size.


The wood I had was from a sheet of 1/4 inch ply-wood. One side was smoother than the other. I decided I wanted the smoother side for the back since the front would be covered anyway. I painted the front with one coat and the back and sides with two coats of white acrylic paint.

Once the paint was dry, I used my glue water to cover the front of the wood. The thinner the coat of water glue, the easier it is to get rid of any bubbles. Then I put the printed quote on top.

I wanted to create a tattered look from the paper to the wood and I also had some over hang on some blocks, so I sanded the edges of the wood and the paper.

Overhang

Sanding with a scrapbooking sanding block


Finished edges

Then I covered the paper with a coat of glue water . The ink from my printer did run if I spent too much time putting on the top coat of glue water. I found that one swipe was good and held together the way I wanted it too. I did add a second coat to the edges.


See the color run? And the ink from the "t" and "h."After this one, I learned to swipe down from the color and only one quick swipe over the letters. This was the worst one, and really, it isn't that bad.

This step is completely optional. I wanted a better finish than just the glue water, so I added a coat of polyurethane. The glue water sealed the ink, so the polyurethane didn't make the ink run.

The polyurethane gave the blocks a little shine and sealed the whole thing. Definitely recommend this step.


Cute, huh?


Sunday, August 19, 2012

Back to School for the YW

For those who don't know, I work with teenage girls at church in a program called Young Women (YW for short). This year, the other leaders and I wanted to get them really excited for a new school year because everyone knows how excited teens are about returning to school! I found this idea on Pinterest which linked me here. This is how some of the items in the back-to-school kit we made turned out and what they looked like when we gave them to the girls today.


I used most of the original sayings, again found here, which were: 

Be a M&M Magnificently Marvelous Example: M&M (This one I changed a bit)
You are writing the story of you life... What does your story tell?: Pen
The decisions you make will effect you now and later: Now and Later 
Sometimes you will make mistakes...: Eraser
just remember the cleansing power of repentance: Almond joy
Be a smartie study hard: Smarties
Stick to you Values even when things get hard: Gum
Remember your great worth: 100 grand
It's important to Laugh: Snickers
Remember you are a daughter of God: Picture of Christ
Love your young women leaders: Kisses

I like to find amazing ideas online and recreate them sometimes making changes to make them my own. This idea came from this Pinterest link and I pretty much used it just how they did it. Please don't credit me for this idea because it was not my own. But they did turn out very cute, so thanks for the idea Holly Davis.