Saturday, September 22, 2012

Salsa Recipe

So, I promise that the canning recipes will come to an end soon as the season is almost over. Then you all get to see my holiday crafts. I have some fun ideas for the upcoming holidays; but for now, I've got to get this canning stuff done before it freezes too hard to ruin my garden. My last canning post will be a green tomato salsa because when it freezes, I have to take the rest of my tomatoes off the vines whether they are done or not. That's when I know canning season has come to an end. And that can be your clue too that all these canning posts will end. Soon, folks, soon. I promise. But for now, you get another canning recipe:

*!SaLsA!*
I got this recipe from a friend awhile ago, so thanks for the recipe! It's the one we use each year because it is the easiest and turns out the best for us. It looks so good when it starts to cook! It really gets me in the mood for some good tacos.

Just put into the pot.
Starting to cook down a bit if you look at the sides.
Some finished jars. Sorry the pic is blurry. But you get the idea. 
Salsa Recipe:

20 cups tomatoes, blanched, and quartered
2 (or more) fresh jalapeƱo peppers
2 cups chopped green peppers
8 cloves minced garlic
5 Tbs. canning salt
4 6oz cans tomato paste
1 1/4 cup vinegar
3 Tbs. sugar
4 tsp. ground cumin
4 tsp. ground oregano

Simmer 1 hour stirring occasionally. Pour into hot jars. Place jars in canner filled with hot water, bring to a boil, and boil for 10 minutes. Remove jars and allow to cool. Makes 12-15 pints.

See, pretty easy. We doubled the recipe, just used two different pans. Instead of blanching the tomatoes we did it in the oven. See this post for directions on what I think is so much easier than blanching the tomatoes. My hubby likes smooth salsa, so we put the cooked salsa in a blender before transferring to hot jars. 

The smell of this stuff cooking is AMAZING! Those spices, the fresh produce from our garden--YUM! Our house smelled salsa-y for a few days. It was great. I hope this makes you all hungry. Go have some good salsa, or for my friends and family, come visit me and you can have some of mine. :) 

Saturday, September 8, 2012

Tomato Stuff

The past few weeks have been crazy busy getting used to a school schedule. Even so, my husband and I have found some time to get some more canning done. We have to get it done so all the hard work in the garden over the summer (thanks mom! she came and helped out for several weeks) would not be wasted. We have canned so many things that I've lost count. We have more than enough pickles to last us a couple of years. Our tomatoes have finally started to turn so we've been able to stock up on our fresh canned tomato sauce which we use all the time. We also got all of our corn out of the garden before too many insects got to it. I think we could have opened our own farmers market!


Last batch of pickles with some pickled green beans in there too.


See our farmers market counter? Funny thing is that it looks like this again--a week later! 


So, for any type of tomato canning, you want to blanch the tomatoes to get the skin off because the skin is just not that fun to chew on when you are eating salsa, tomato sauce, or any other tomato thing. After a couple years of blanching the real way standing over a pot of boiling water with 3-4 tomatoes in the water for a minute or so then submerging it into a bowl of icy cold water and having to change both waters after about ten minutes. I found a way to do it in the oven. So much faster and easier.


Core tomatoes. If they are really big, cut them in half. put them in a pan--not touching I learned after the first time I tried it. Bake in the oven for about 10 minutes at 400 degrees. The skins should come off pretty easily after the tomatoes have cooled enough to touch them.


After peeling the tomatoes, I squeezed out the extra watery juicy stuff because I have yet to make a thick enough tomato sauce. Then, put the squeezed and squashed tomato into a heavy pot. I filled mine up to the brim because it will cook down. You can see the sauce lines going down the sides of the pot. I reduced mine about half way. Every so often, I took a soup ladle and took out some more water. My goal was to try for thick sauce this time. It took about an hour to simmer it down.


Once as thick as I think I can possibly get it, I blended it to create a smooth sauce. 


 Processed and finished. I don't mind the seeds in there. If you don't like the seeds you can always use a sieve to get few to no seeds. 


I had to post a picture of this. This poor pot has been through so much with me. There is never a time when I fail to burn the bottom. I am not a good example of staying close to my cooking items to keep them from burning the bottom. A little soap and water and back on the oven to get the burnt stuff up. It works, and year after year this pot and I go through the same love/hate relationship. 

Did I inspire you? If so, here are some recipes. Enjoy!

Tomato Sauce
Core tomatoes and put in a pan. Bake at 400 degrees for 10 min. Peel and place in pot. Smash, cook, and stir frequently until desired thickness. Put 1 tablespoon lemon juice in jars. Fill to 1/4 inch headspace. Process for 30 minutes in boiling water bath.
NOTE: 24 pounds tomatoes = approximately 6 pints

Cream Style Corn
9 cups corn
1 cup sugar
2 tsp salt
2 cups water

Thickening sauce:
1 cup flour
1 1/2 cups water
Mix together before adding to corn.

Husk corn. Cut the tips of the kernels off of the corn cob. Scrape the rest of the kernels off with the back of the knife or a spoon. Cook in a heavy pot. Add sugar, salt and water. Bring to boil. Add thickening sauce. Cook additional 10 min. Stir constantly. Remove from heat, cool, transfer to freezer safe containers (I use freezer bags), freeze. 

Yes, I did burn the pan with cream corn too. I told you this pan and I... :)


Sunday, August 26, 2012

Monthly Meal Plan

In the midst of the craziness that is my life, I have found that I MUST plan for meals ahead of time so my family is saved from my go to frozen pizza or mac and cheese meals every single night. I started out using this meal planning organization which I love from Bold Turquoise. She has organized an entire binder of months and shopping lists and recipe sheets with tabs and labels and everything (so right up my ally!). I even gave my a copy of my monthly plan and recipes to a friend one time. I still love the idea, but I don't have the time at this point to find recipes, create large shopping lists, write down my recipes, and plan meals for every single day. When I have more time I'd like to re-vamp her ideas to make them more workable for my family. I'd even love to plan a year long recipe binder like she does. If I do a year at a time, I wouldn't have to change too much. AND, if I take good care of it, I could just reuse it year after year. That'd be nice!

But, for my now, I found this great monthly meal plan on Pinterest that already has the meals included from Confessions of a Homeschooler. Bonus for me... no sea food. :) This one is for the month of August, but I figured I'd just start at the beginning and work my way through no matter what day it really is. She also has other months for you to choose from. I will only be using the dinners as I am rushed for time in the mornings-so cereal and fruit here we come.

The downloadable calendar includes links to some of her recipes. To save time each day for me, I copied and pasted those recipes into one document. The recipes are in order of when they will be used. I included a link for those who would like it: Recipe List. Please remember that these are not my recipes, and I give full credit to Confessions of a Homeschooler. Again, I only have the dinners in this list.

Lastly, I wanted to make shopping as easy as possible so I created a weekly Shopping List to go with the monthly plan. Many items are staples that I try to keep on hand so I didn't include those in the shopping lists. If you utilize these, be sure to double check that you have all the items needed before trying to make something. Remember: dinner ingredients only are on these lists.

For those who are thinking that if you start this you have to stick with the plan-you don't. When I started mine from Bold Turquoise I was pretty lenient on when I cooked each meal. Some nights you really won't feel like cooking and that's okay. This is just a way to prepare ahead of time for something to eat. When I get home from school, I have about an hour or two before it is supper time. The last thing I want to do when I get home is try to figure out what to make and try to see if we have all the ingredients only to find that we don't. These meal plans help me know what is coming so I know that we have the ingredients needed, and I don't have to feed my kids junk all the time. Besides, if you don't like something, it is so easy to add in your own family favorite recipes.

Happy Eating!


Thursday, August 23, 2012

Back-to-School

This year summer flew by way too fast. I was not ready to return back to school. I feel like most of my summer was spent recuperating... oh wait, it was! No wonder school came too quickly for me this year. However, for my little girls it was a completely different story. The very first week of summer they were asking if it was time to go back to school. Well, after a long summer for them this is what back-to-school brought for them...

Something this summer happened to me, and I began looking at my children as little people that were not going to stay little for long. I realized I wanted to create memories for them that would last them a lifetime. With that, I came across this blog thanks to the help of Pinterest. I decided I wanted to begin some new traditions that would help light the spark of childhood and could even be carried out by my children if they wish.

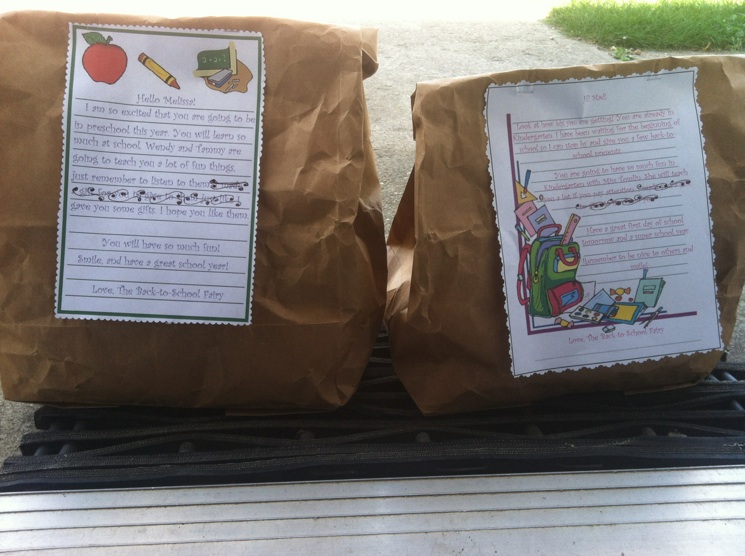
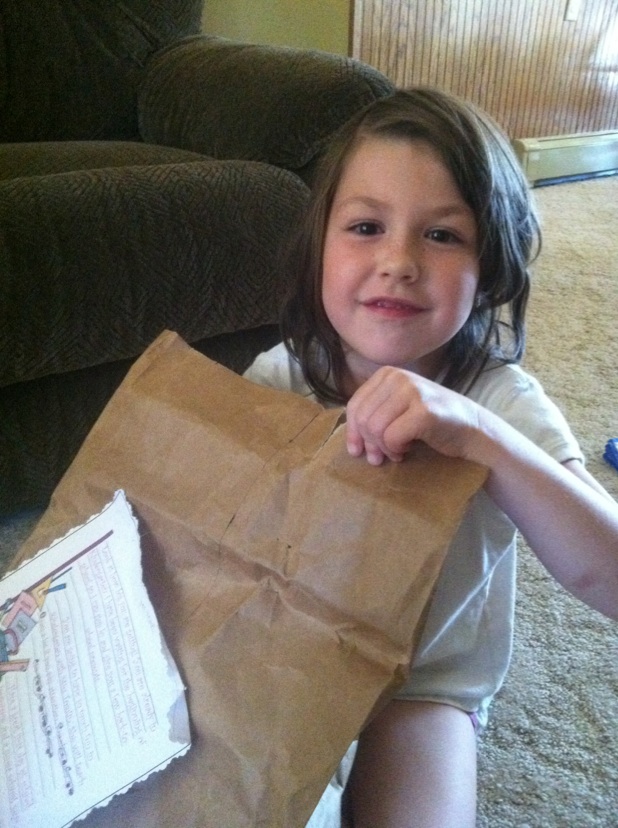
The first tradition I started was the back-to-school fairy. This sweet little fairy brings the kids a few little gifts for the beginning of school. My intentions were to have the fairy ring the bell sometime during the evening right before the first day of school. It didn't quite work out that way as my two little curious girls found the packages outside the door before the bell rang. But, that's okay, there was still excitement and wonder as to where the bags came from. Each bag had a letter on it for each girl and a few things inside.


The second tradition I wanted to try out was making a gift for each teacher at the beginning of the year (in addition to the small gifts I created in previous years for Christmas and end of the year). Each gift had a tag that said the teacher's name and I hope you have a colorful year. The girls gave them the gifts on the first day of school.


This was the before shot.
Here is the after shot minus the tag.

Again, the before shot.

And, the after shot minus the tag.

The final tradition I wanted to start for back-to-school was a special breakfast for them. Because they started on different days, it worked out perfectly this year to have their own special breakfast on the morning they started school. They got to sit in mom's seat and have some fun things around them. 

The sign I made for my kindergartener. We took pictures with it the next day before school. The overall view of what she saw the next morning when she went to eat breakfast.
The fun framed sign I made for decoration. I used it for both girls.

 This is what my preschooler saw the morning she got up along with the what I want to be sign for her. I wrote each "what I want to be" in the girls' favorite color. The oldest was pink and the youngest was purple.

Although it was a little rushed in the morning and filled with anxious jitters, it was a good way for each girl to know that they were special and enjoy the thrill of going back to school. I wonder how long the desire to return to school each year will last? :)


 Annual "by the door" photo. I didn't take a picture of her with the "what I want to be" with my phone, so it's not on here, sorry.

Sentimental mom moment: walking my big girl to school. I'm allowed a few of those, right?

Sitting at her table. Excited and ready for the first day. 


Annual "by the door" photo.

Found her cubby. 

Found a friend she knows.


And so begins another year full of learning and fun. 

Sunday, August 19, 2012

Back to School for the YW

For those who don't know, I work with teenage girls at church in a program called Young Women (YW for short). This year, the other leaders and I wanted to get them really excited for a new school year because everyone knows how excited teens are about returning to school! I found this idea on Pinterest which linked me here. This is how some of the items in the back-to-school kit we made turned out and what they looked like when we gave them to the girls today.


I used most of the original sayings, again found here, which were: 

Be a M&M Magnificently Marvelous Example: M&M (This one I changed a bit)
You are writing the story of you life... What does your story tell?: Pen
The decisions you make will effect you now and later: Now and Later 
Sometimes you will make mistakes...: Eraser
just remember the cleansing power of repentance: Almond joy
Be a smartie study hard: Smarties
Stick to you Values even when things get hard: Gum
Remember your great worth: 100 grand
It's important to Laugh: Snickers
Remember you are a daughter of God: Picture of Christ
Love your young women leaders: Kisses

I like to find amazing ideas online and recreate them sometimes making changes to make them my own. This idea came from this Pinterest link and I pretty much used it just how they did it. Please don't credit me for this idea because it was not my own. But they did turn out very cute, so thanks for the idea Holly Davis.

Friday, August 17, 2012

Baby Oil Cleaning

My hubby and I cleaned out our bathroom the other day. We had so many things shoved all over the place that if we wanted to do something like cut hair, we'd have to get the clippers from this spot and the scissors from there and a comb from way over that way. Additionally, we had so many baby items and sadly for me we have no more babies. :( 

As we were cleaning cupboards, we came across several containers of baby oil. I hardly ever used it when my babies were actual babies so we had quite a bit. Not wanting to waste it, I scoured Pinterest for ideas for baby oil. I came across this pin and decided I would try to clean my very scummy bathtub with it. 

To my surprise, it worked! I also read somewhere that used dryer sheets make excellent cleaning clothes so I tried those with the baby oil. It was fine, but a regular towel worked good too. 

Before: UGH!!!

After: YAY!!!

Bubble baths here I come! :)

Wednesday, August 15, 2012

Pickled Beets


Remember how I said I liked getting back to the basics of life? Well, for me part of that is being able to provide food and such for my family without having to run to the store every other day. Granted, the closest actual grocery store is about half an hour away so making a trip to town a few times during the week is just not a plausible thing for our family.

Throughout the past few years I have been learning how to and practicing my canning skills. I have done a variety of jams, pickles, tomato products, meat, and pie filling. Yesterday, with the much-appreciated help of little hands, I made 24 pints of pickled beets. That is quite a bit for those who don’t know. It took us 5 hours, but it was fun. I used a recipe from my great grandmother that was passed down to my grandpa and then down to me through a cherished family cookbook. I love the thought of knowing that I am doing and teaching my children the same things my ancestors did. I feel like I can be connected with those loved ones who are angels on the other side in some way.

Though canning is most definitely not a simple process, it is part of my simple lifestyle that I love. If you want to give it a try the recipe is included below. This recipe is probably more special to me because my grandpa grew up on a farm but relocated to Las Vegas. Although he lived in the middle of a city he still held onto his country roots and used this recipe many times to create these sweet pickled beets. Enjoy!


So, I have a great farmer friend who loves pickled beets. A few years ago, he told me that his mom was going to stop canning and thus ending his supply of pickled beets. It just so happened that I was planning on attempting this recipe for my very first time that fall when my beets were done. Ever since then my beet crop has been very small, but I do still try to get him a can or two each year. Well, this year we happened to be out on the farm when he had just picked tons of beets. With my previous offer still out there, I was given a big box and another bag full of beets to can. I still had a bag full of beets in my fridge from my own garden that I was able to add to the mix.

Step 1: Get helping hands! My oldest was such a good helper, and I could not have gotten it done in the 5-hour time span without her help.


 We filled up four pots and still had ½ a box of beets left to wash. I think I need a bigger stove, oh and more pots—ran out of those too. My farmer friend (aka Papa Bruce) said next year he’ll be sure to buy me bigger pots. Thanks for the support Papa Bruce!


 Next came cutting the tops and bottoms off, pealing, and slicing. Yes, that is beet juice all over my counter with another shot of my helper. You’ll see how much fun she had within the next few pictures. She had never tried beets before so she and I ate a couple quite a few of these amazing things. Peeling is quite fun too actually. If they are cooked completely, the skins just slip right off. But it is a messy job…

See, fun stuff, right?


After filling 24 pints worth of jars with beets we added the rest of the ingredients. Then processed them, and this was our end result. That’s a ton of beets! Papa Bruce should be able to make these last a week or two. J


 I’ve been canning for about 4 years and have never had a jar break in the water bath (first picture for those non-canners out there). Imagine my surprise when I lifted the canner lid to find bright red bubbling water with beets floating around. Luckily the break was clean and it was only the bottom that busted without shards of broken glass everywhere. Couldn’t save the beets though. L


Okay, ready to give it a try?

My family recipe for Pickled Beets

3 qts. Beets (enough to fill a three quart pot)
2 c. Vinegar
2 tsp. Salt
1 c. Sugar
2 c. Beet juice
¼ tsp. Mustard seed (in each pint)
2 Cloves (in each pint)

Cut beet tops off, leaving about 1½ inches of the beet top on. Boil the beets about 50 minutes. In a separate pan, place the vinegar, salt, sugar, and beet juice and bring to a boil. Once it begins to boil, turn down the heat. In each pint jar place cut, booked beets and the mustard seeds and cloves. Pour the liquid ingredients into each bottle. Place the flat lid for the pint jars in a pan with a little water. Bring to a boil then turn down. Do not let lids boil! Place the lids onto the pint jars and screw on the metal tops (rings). Place pint jars into pan with rack (so the bottles will not touch the bottom of the pan) and boil for 15 minutes. 

Yummy!