Wednesday, January 30, 2013

New Year's Eve 2012


Taking a little break from the quiet book for a day, I wanted to share my New Year's Eve night with you. I must admit it turned out WAY better than I ever expected. And, all the kiddos actually made it!

It first started with an idea on Pinterest that was to pop balloons each hour until midnight. While I loved this idea and might use it in the future, I have no balloons and do not have helium anywhere near where I live. (If I was going to do the balloon thing, I wanted to do it right have have the balloons floating in the air.) So, from this idea came what we actually did:

First, I wrote down many activity ideas on strips of paper. Some were Wii games, puzzles, color, watch a 30 minute show, make cookies, etc. All things I knew my kiddos would enjoy. I ended up writing 8 activities because I wanted to start at 8 pm- the kids normal bed time- and do an activity every 30 minutes to keep the pace for the night quick. This was probably the best thing about the entire idea because there was such short amount of time to get the activity out and do it before it was time to open the next bag, the night flew by! We were constantly going. Then, we filled the bags. I put the quiet, little movement ones toward the beginning and kept the more active ones for later in the night when I figured the little ones would begin to get tired so we could try to wake them up a bit. I figured that I'd loose one or two to sleep and that would be just fine.


After putting the activities in each time labeled bag. I asked my mom, so creative, to come up with some tags for each bag. We tried to make them shiny and fun. We started at 8 and counted down to 1. On each bag, we wrote the name of the child that would open the bag. It ended up perfect because my little brother was here so they each got to open 2 bags. As they opened the bags we all gathered around in anticipation of what was next. It was so cute!

TIME TO BEGIN:
So, we set out these bags in a couple lines on the kitchen table. Then, we got the kids ready for bed, brushed their teeth, read a story, and said a prayer. We said goodnight to everyone. The kids looked so disappointed and a little confused as to why these exciting surprises were out but they were going to bed. Finally, after holding them off as long as we could, we told them that because they worked so hard during the day they got to stay up and celebrate new years eve. (They really had worked hard that day cleaning and organizing their clothes and toys and books.) The were beyond excited.

We began our "Kiddie Countdown." You can see the excitement and enthusiasm they have. We even kept the activities a surprise for my younger brother. *It actually occurred to me that I can no longer call him my little brother as he is most definitely taller than me now.*

As they opened their bags they got to pin their tags onto their shirts. Which made the night even more exciting! These four pictures were taken earlier in the night when they were still awake.

The puzzle activity was a possible turning point. I thought for sure my two youngest would fall asleep. They looked at me like they were ready to fall over they were so tired. I kept asking if they were ready for bed. Everyone said, "No!" I knew after the puzzle activity we'd need something to wake us back up, by this time I think it was 11ish, so we got to eat the cookies we made earlier that night. Plus we had those little hot dog things cooking in BBQ sauce the whole night, so we snacked on those. 


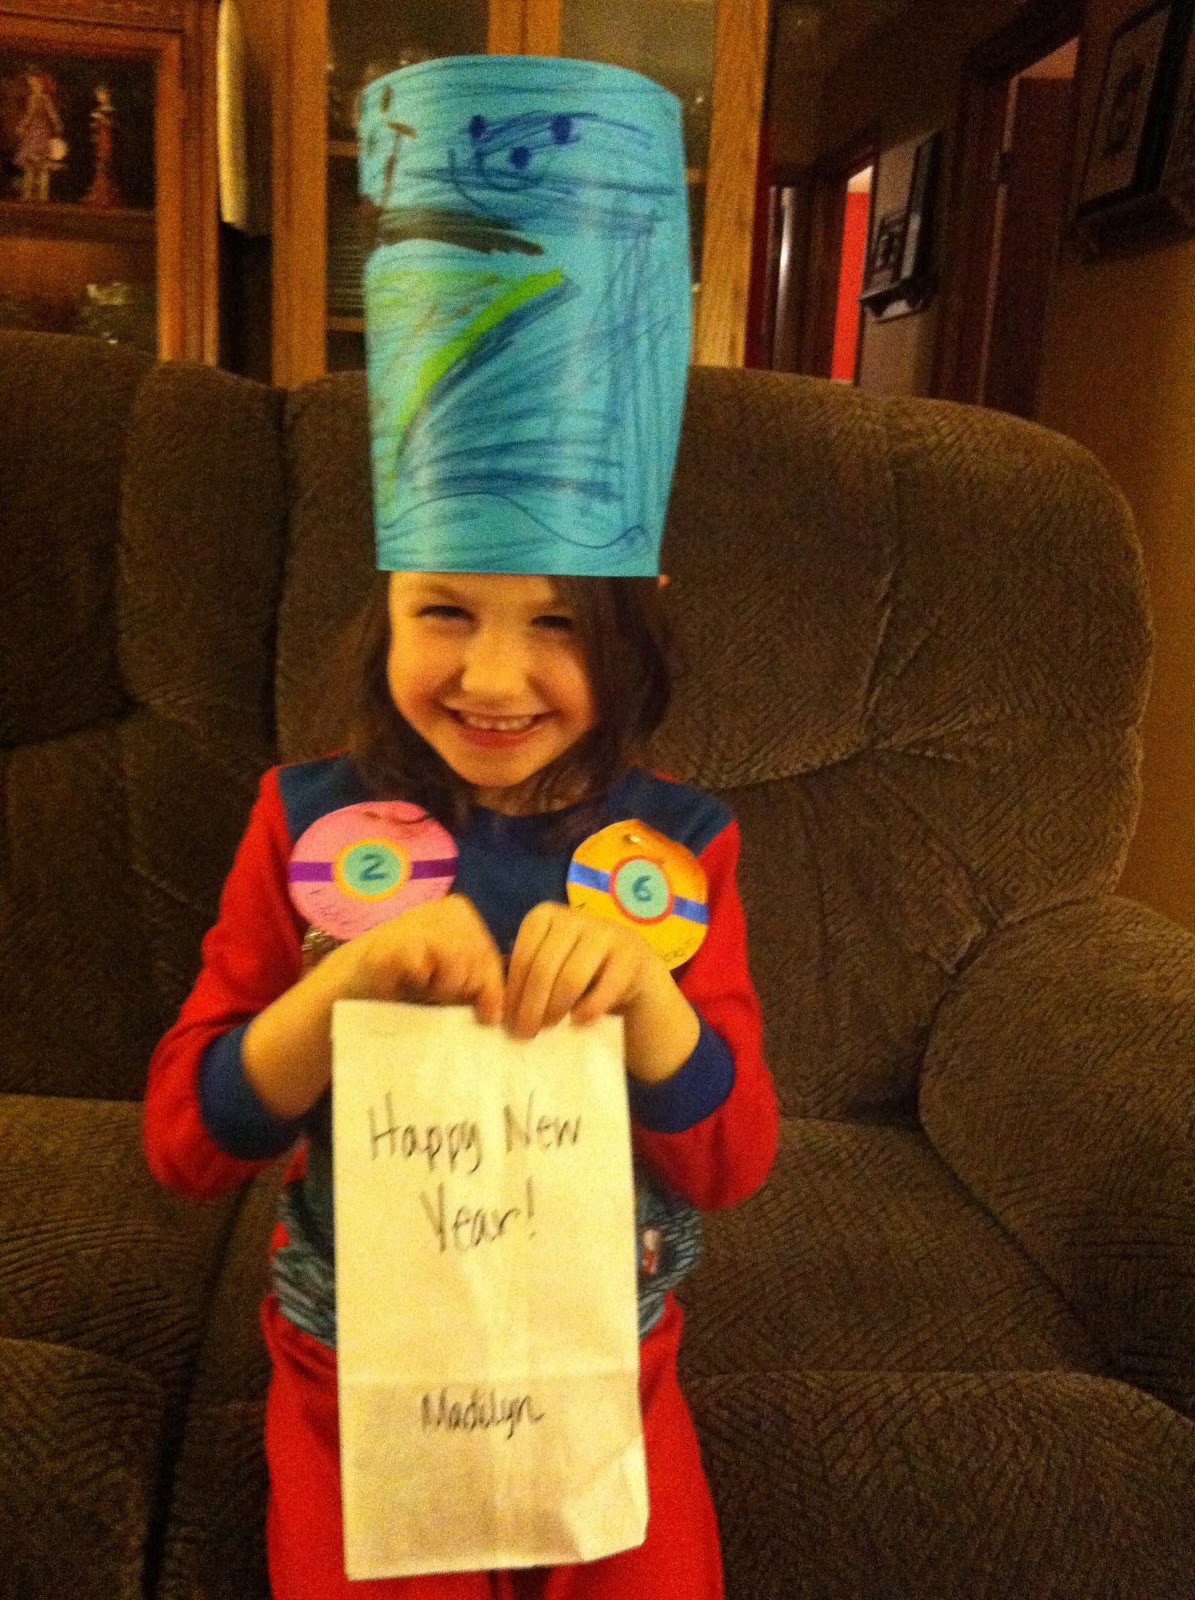
The last activity was to make party hats. Right after that, each kid got a bag that was filled with a noise maker, ribbon strings, and a piece of candy. We all sat around for about 30 seconds waiting to rip open the bags and throw the ribbon around. As we were getting ready for the countdown, my hubby and mom came back from touring his work. Just in time... 3, 2, 1...

It was pretty difficult to get a good picture of each of the kids as they were all moving around and excited. But I managed two. 

So after all the excitement we found these little rascals...


Okay, we really didn't find them like this, but aren't these pics just adorable! I love them!


...And to all a good night! Oops, wrong holiday... =)


Tuesday, January 29, 2013

Quiet Book- Barn

This is one of my favorite pages. My son loves it too. I did find this idea at Sunshine, Lollipops, and Rainbows. She even had templates if you are interested. As for me, I simply eyeballed all of it. 


Yes, the barn is slightly crooked, but that's because here in North Dakota it is so windy that the barn is leaning. I am perfectly okay with this explanation; however, if it is not so windy where you live, I suggest pinning your pieces before sewing them. I didn't want to take the time to do it. 

One of the best parts of this page is what is found under the barn doors...


FINGER PUPPETS! This is one of the pages my son spends quite a while on. He plays with the finger puppets and has them play in the field and they have inaudible conversations with each other. Even my girls like to get in on the action. They each get one puppet, sometimes mom gets one too, and we go frolic in the field. Sometimes, though, it is nap time and usually the horse gets to sleep in the straw on top of the barn. I can only imagine what fun ideas my kids will have for these little animals as they get older. 

If you look closely and the barn doors in the first picture you will see that I used a button and button hole to secure the doors shut, a genius idea that I found online. Sadly, however, the second time it was in use my wonderful, but rather strong son ripped the felt piece with the button hole to get the door open. If you are going to use a latch idea, I suggest securing it really strongly-maybe use two pieces of felt sewn together.

More pages to come!

Monday, January 28, 2013

Quiet Book- Mr. Potato Head

The second and third page of the quiet book are Mr. Potato head pages. This is not my own idea, but I didn't use a pattern for anything. I just eyeballed everything. I did not use any velcro or attachments. It is just felt that lays on top of the potato and arms which are sewn onto the page. I found many different ideas to store all the pieces, but this simple brown box was the easiest for me. I was a little worried that we might loose some if I made the opening too big, but so far we haven't lost any pieces. I am thinking about making more pieces at some point. Maybe more ears and different style hats and shoes and noses. 


This page has been a hit with the kiddos.

Sunday, January 27, 2013

Quiet Book-Front Cover

Believe it or not, I am actually getting requests for me to post this. Yay, my first request. ...Thanks Mom! =) Ha!

So this begins a series of upcoming posts about a quiet book I made for my son. I wanted to limit the amount of things I was taking to church for my kids, and this one one way for me to do so. Before I began, I scoured pinterest for ideas. Between using some ideas I saw and some I came up with, I created a book that I am pretty proud of.

The first page is what I made for the cover. I didn't want to put his name on it because as he gets older I might give this to someone who could use it more than my kids, or I might save it and give it to his kids. 

I saw what I am going to call overall clips-because I cannot think of what they are really called-on sale. I knew they would be perfect for a little boy and hoped I could incorporate them into his book. I also knew that I wanted to use some old jeans that I have been saving. I created a pocket using the top half of the back pocket of the worn jeans and used some leg denim for the rest of the bibs. The kids love putting various items in the pocket for the next week to find. (I only let them play with this at church. It keeps the excitement-at least for now.)

I created each page on its own felt sheet before sewing each one together. I also figured out how to use my sewing machine to make button holes. It was exciting!


Stay tuned for more to come. My goal is one each morning. I know it is ambitious, but I've got a plan. Let's see if I stick to it!

Oh, and I am taking requests now... HaHa!


Tuesday, January 22, 2013

Felt Pizza

I thought I had all of the felt food up here, but then I saw this adorable pizza I made and realized I forgot about this one. This is probably one of my favorite food pieces I have made. I think it is so cute!

I started by cutting the pizza shape, blanket stitched the sides, and stuffed with leftover felt pieces. I would suggest not stitching these pieces together until after you add the toppings unlike what I did. It just makes it easier.

I cut a piece of red felt to make into the sauce, and a piece of off white felt for the cheese. You could add any toppings you wish. But I thought the mushrooms and pepperoni were so cute. Stitch all of these together working from the top down. So stitch the toppings onto the cheese first, and then the cheese to the sauce piece. 

For the crust, I simply folded the top over and added a little more stuffing to make it look more like a real crust. Then stitch down. 

Didn't it turn out adorable? 

Saturday, January 19, 2013

Spiced Carmel Pear Jam

This is one of my most favorite things to can. It is so good and rather different. It makes great gifts and is not to terribly difficult to make. I got the recipe from here, but I also posted it below. Enjoy!!!

We bought a huge box full of pears from a program at school. I think there were 80-some pears in there. 

Here is what it looks like when it is cooking. Yum, it's making me want to get open a jar now and spread it on a crispy warm piece of toast. 

Spiced Carmel Pear Jam:

Ingredients-
4 cups chopped, peeled, and cored pears
1 package powdered fruit pectin
3 1/2 cups sugar, divided
1 1/2 cups packed light brown sugar
1/8 teaspoon ground allspice
1/8 teaspoon ground nutmeg
3/4 teaspoon ground cinnamon
1/2 teaspoon butter, optional-but highly suggested

Directions-
1. Prepare your water bath canner, jars, and lids.
2. After peeling, coring, and chopping your pears add them to into a large pot.
3. In a separate bowl add the pectin and 1/4 cup of the sugar; mix. Add the pectin mixture to the pears in the pot and cook over medium-high heat, stirring. Bring to a full rolling boil. Mix in the remaining sugars and spices. Add butter. Stir constantly bringing to a full rolling boil again. Boil for exactly 1 minute longer. Remove from heat and continue to stir for 5 more minutes.
4. Fill hot jars with jam. Leave 1/4 headspace. 
5. Process for 10 minutes.
6. Remove to cool. Do not invert.

Makes 6-7 half-pint jars.

Tip: I read or heard somewhere that if you are making a huge amount of jam that it is best to only double or triple the recipe for each batch. If you do more there is a greater chance that the pectin will not work as well. Not sure why, but I hate messing with jam that did not firm the first time. 

Tip: I did try to use liquid pectin, not suggested. We will be using a few jars for fruit syrup instead of jam... :)


Wednesday, January 16, 2013

Trash to Treasure

I have seen several different ideas floating around Pinterest about using toilet paper rolls to make art. When I started this project, I couldn't seem to find any tutorials on how to do it. So I decided to dip my hands in and give it try on my own. Now I think there are some tutorials. A little too late for my project. Ah well.

1. First thing you need to do is collect toilet paper rolls and/or paper towel rolls. You could even use wrapping paper rolls if they aren't too thick. 

2. Once you have collected several you are ready to get started. I really don't know how many I had, maybe 40-50. But you can always get more if needed, right? For us, it was a pretty fast process: 5 TP users everyday, several times a day, equals quick gathering of materials.

3. Then you can decide how wide you want to cut the rolls. Mine were an inch. You want to make sure that you are consistent in the width of all your pieces. I got four pieces out of one toilet paper roll. 

4. To make the cut, you should lightly push down on the roll, measure out the desired width, and snip away. If you are going to change the color of your rolls (highly suggested), you can easily mark the rolls before you cut them to ensure even thickness throughout the art project. 

5. After cutting, you will begin piecing the toilet paper into a design that you like best. I started by making flowers. Each whole flower had 6 pieces. I glued them together using regular craft glue. Once I had my flowers, I added little curly q's to connect the flowers. To make the curly things I just cut the roll so it was one long open piece of cardboard. I used my fingers to add curl as desired.

This picture is not the greatest, but you can get an idea of what to do.

6. Once you get the design you like, you can begin glueing all the pieces together. 

7. I wanted a frame around mine. Because this was a gift for my mother-in-law, I was able to convince my hubby that this could be his contribution to the project. I got inexpensive wood from a hardware store/lumber yard. I found it in the wood molding section. He cut it and glued it together with Gorilla Glue. To cover the seams of the corners, we added pieces of triangles to the font corners of the frames.

8. Once the frame was finished, I put my glued together TP roll pattern inside. I had to add more flourishes and a few more flowers and such to the frame to make it just how I wanted it. I attached the cardboard to the frame using the same craft glue. 

9. When the glue is all dry and you are completely happy with the pattern, you can paint it. I chose a black iron looking spray paint. It took about three coats to get everything covered. 

But it turned out great! Don't you think?

I made two of these for a gift. I can't tell you how long it takes to make one because I took my time starting this about 6 months before my mother-in-law's birthday. 

My husband and I set these in her house behind a small coffee table with a tag tied to it and just waited for her to find them. When she did, my father-in-law said, "Wow, those things are expensive!" Then they lifted them and realized they really weren't heavy iron art, but a less expensive version. They have them hanging in their house proudly displayed. Yay!


Have fun with these, the possibilities are endless with all kinds of creative patterns just waiting for you.

Tuesday, January 15, 2013

Strawberry & Carrot

The last of the felt food. Sad to say goodbye, but glad to welcome room for new exciting posts! Besides, it's been awhile since I made these for Christmas gifts, so it is about time I get these things finished up on my blog!

Strawberries:
Here is the final product. It is made about the same way the carrot is below. Except the green top is simply stitch onto the top. The carrot top is a little different.

Carrot:

Cut the felt the size you would like it to be. Remember you are going to be stitching the edges you cut together so you might have to experiment with size and shape. After cutting the shape you want it to be, stitch the sides together to make a cone shape. Leave the thread hanging on the top- you will use it later.  Depending on what kind of stitch you chose, you can turn your carrot inside out so the stitching in not visible. Stuff with anything you wish. I used extra felt pieces and thread pieces. Stuff until it is as firm as you would like it to be. Take your thread- that one I told you to leave hanging- and stitch around the top. Pull the thread tight to bring in the top. Before securing the top stick strips of green felt into the top. Run a few stitches through those to secure them. Finally knot off the top. 

Finished product!

Note: I did all the felt food with hand stitching because that was the look I was going for. It would be just as simple if not easier to do with a sewing machine for some items of food. 

Pasta, Lettuce, & Tomato

This post includes some more felt food. Yay, it is making me hungry. It must be lunch time.

This felt pasta was easy to do. Cut felt into squares and tie it with embroidery thread in the middle. And finished! Told ya it was easy :)

The lettuce was fairly simple too. I cut the shape I wanted and added embroidery thread to make a vain in the way a real lettuce leaf might have. It actually looks better in real life than in the picture. Isn't that the way it always is?

My tomato slice was a little more complex. But again, it looks better in person than in the picture. To do this, I basically followed these directions. I used red for all the pieces though, and I used gold embroidery thread to make seeds.

Enjoy!

Tuesday, January 1, 2013

Felt Bread

I made several pieces of felt food for my kids for Christmas. This is the bread I made. I used a blanket stitch because I like the look. You could easily sew these with a machine for a more clean look. I wanted something simple and rather quick with little fuss. 

                                     
The first thing you need to do is cut out your felt pieces in the size and shape you would like. You can use a template if you wanted to. I am not quite that professional to use a template. I just eyeball it. 


Next blanket stitch the flat part with the sides of the bread. 

Fill with whatever you wish. I actually used an old mattress pad. Then I stuffed left over felt scraps in the part of the bread that sticks out a bit at the top. 

Finally, blanket stitch the other side of the bread to the stuffed piece. 

Wallah, finished.