Friday, March 29, 2013

Spring Party

I would not be the first to say that winter has overstayed its welcome this year. Everyone in our house is itching to get outside including Bently, our hyper one year old dog. The problem? Highs in the teens and lows in the negatives. Yes, still at the end of March we are freezing up here in North country. And then a thought occurred to me: maybe if I have a spring/Easter party with some friends mother nature will change her mind and send us spring.

This is the picture to our backyard. Nice, right? HUGE drift!

The Plan:
We have some really good friends who have kids around our kids' age. They love playing together but because we are all so busy and they live about 40 minutes away, we don't get to see them too often. We decided to get together and do a few fun activities with our kids.

The Activities:
We each decided to pick an activity or two for the kids. I will add links and pictures after we party it up.

Door Hangers

Foam stickers and fun!
Rice Crispy Eggs

Click here for pictures and directions.

Egg Scavenger Hunt

Click here for details.


The Food:
I wanted something simple and fun for the kids. After all, today is all about the kids, and I wanted them be a part of as much as they could be.

Flower Sandwiches
More details to come but for now you can know that it involves plastic cups, flattened bread, muffin tins, meat, and veggies.

Click here for more details.

Spring Butterflies
As a side to our flower sandwiches we will be eating butterflies--Apple butterflies!

Click here for a picture and directions.


Stay tuned because with 6 adorable kiddos, the pictures are bound to be SUPER cute!!!

*UPDATE*
Extra Photos from our fun day!

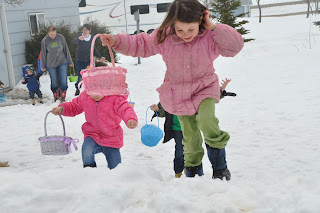
The kids trying to get a running start over that huge drift you saw.


Posing at the top of the drift.


Monday, March 25, 2013

Healthy Weekly Meal Plan

Over the past few weeks I decided to stop doing the 2nd month of the Insanity workouts. Before you start loosing faith in me let me explain. It really is a simple explanation, I simply do not have time to do the hour long workouts right now. I know you are thinking they are only an hour, that is not too long. But, after each exercise session I am dripping in sweat so I have to take a shower and the likes. Now we are at 1 1/2 hours. In addition, I have all the housework to get done after I get home from school. Plus supper. I thought I had a super idea, duh: just workout in the morning. So I wake up early and exercise before everyone gets up. That would be genius, except that the 1 1/2 hours does not include the time it takes to do my never cooperative hair, makeup, and getting ready for work. Include that time and we are at 2 1/2 hours, plus breakfast, and getting 3 kids dressed, fed, teeth brushed, and lost shoes (boots, snow pants, hat, glove, folder, scarf, you name, we lost it) found. Total time for morning exercise: 3 1/2 - 4 hours. That would equal out to me getting up at 3:30- 4 am every morning. However, (I bet you thought my rambling about this whole time situation was over, almost, but not yet.) sometimes I sub, sometimes I don't. Sometimes I work the afternoons as an extra aide, sometimes I don't. Sometimes I have two kids at home during the day, sometimes only one. Sometimes we have to go to town, sometimes we don't. See what I'm saying. My life is so unpredictable at the moment that I simply don't have the time for such intense hour long workout sessions. No fears though, I still love the program and am hoping to pick it up after school is out and I have more leisure time.

In the meantime, I still want to eat really well and do simpler workouts. I have a few other DVDs that I like to follow along to and there are so many online that really, if I have the motivation, I will continue to tone my body--my original goal in the first place.

I put together a weekly meal plan using a few healthy recipes that I found online and the meal plan book that came with the Insanity workout which you can find here. I usually cook a main meal for my family and a separate one for me. I thought this would be a pain, but really the meals are so simple that I don't find it too irritating making two different meals.


Monday
Tuesday
Wednesday
Thursday
Friday
Saturday
Sunday
1
Proatmeal
pg 16
Bagel & Grapefruit
pg 18
Egg White & Fruit Plate
pg 18
Cereal Bowl
pg 20
Egg White Breakfast Wrap
pg 19
Egg Sandwich
pg 25
Warm Cereal Bowl
pg 20
2
Peanut Butter Protein Shake
-Banana
-Peanut Butter
-Protein Powder
Vanilla Banana Smoothie
-Protein Powder
-1/2 banana
-Almond Milk
-1 c berries
½ Peanut Butter and Banana OR Jam Sandwich
Rice Cake
Berry Protein Smoothie
-1 ½ scoops protein powder
-1/2 c berries
1 c Almond milk

Yogurt & Fruit
-1 tsp honey
-2 tbsp walnuts
-1 apple, diced
Cottage Cheese
1 cup
3
Deli Sandwich
pg 28
Chicken Ranch Wrap
pg 36
Roast Beef Sandwich
pg 34
Pasta & Veggies
pg 37
Turkey/Apple Pita
-1/2 c Spinach
-1 oz Turkey
-¼ sliced apple
Mexican Style Eggs
pg 25
Protein Omelet
pg 26
4


Pizza Muffin
pg 43


5
Chicken Stir Fry
pg 54
Grilled Chicken Salad
pg 33

Citrus Baked Chicken
pg 52
Baja Style Chicken Bowl
-Saute Red Pepper, ½ c frozen corn, ¼ c black beans, 2 oz cooked diced chicken
-Spoon over brown rice
Steak with Broccoli
pg 50
Lean Burger


The page numbers refer to the meal plan book that is linked above, but also here for your convenience. This is custom for my schedule. For example, I never know if I am going to sub so my second meals are easy to make in the morning and take with me to school. On those days, I eat a simple meal at school and eat my 3rd meal for my 4th meal. I have most of the 4th meal spots empty for this reason. If I am at home, I simply repeat one of my 2nd meals. I don't have a 5th meal on Wednesdays because I am usually busy elsewhere. I also did not use all the meal ideas from the book because I don't eat seafood, or I simply don't like it. The point is that you can make this customizable for you, your likes, and your time.

Sometime soon I hope to have a weekly exercise plan to post. Stay tuned!

Monday, March 18, 2013

Stand in Holy Places Necklace

At church there are three people who work with the teenage girls. One works specifically with the 12-13 year olds, one the 14-15 year olds, and one the 16-18 year olds. The three of us work together to try to create the best for all of the girls. We think that a teenage girl's birthday is pretty special, and we decided that these were too good to not give all the girls.  Me being, or should I say pretending to be, crafty thought this would be easy enough to make. It was pretty simple, and they did turn out great! 

This idea comes from The Idea Door. She posted all the links which made it very easy to find and order all the materials. But there were no directions. I feel comfortable enough to put these together without directions, but for those who like or need step by step, here ya go. These are easily adaptable to create any kind of necklace you would like.

The materials: 
  • A charm. I got these Salt Lake Temple charms from Charming LDS Gifts.
  • Split rings. You can find these at any craft store with a jewelry section. I got mine from Wal-mart.
  • Quote or picture printed on photo paper. I downloaded the 2013 Mutual theme scripture from The Idea Door.
  • Clear epoxy stickers.
  • Ball Chain.
  • Bottle Caps. I bought the epoxy stickers, ball chain, and bottle caps from Fizzy Pops on Etsy. They came as an entire kit which was very convenient. 
  • Glass Pearls. You can get these in a jewelry section. I got mine from Wal-mart. They came in a string with large beads, small beads, and silver beads.
  • Head and eye pins. I got mine at Wal-mart.
  • Needle nose pliers. Unless you have a jewelry making tool that works better than needle nose pliers. 
  • Double sided tape.

Once everything came I was so ready to get started. I made these while my husband and I watched a movie. 
Here is the charm. The hole was too small for the ball chain, so I had to use split rings.


These are the rings that usually go on key chains. You have to open one side and slide the key on. Then you have to twist the key and the ring in opposite directions to the the key securely on the ring. These are just a smaller version of the key ring. 

This was probably the hardest part. These little buggers were so stinking small. I struggled to figure out a way to get the charm onto the split ring. But once I found a way, it worked like a charm. =) My nails are not that strong and are not very long, but that is what I used for this part. I stuck my thumb nail in the middle of the ring toward the end of opening.

 Then, I slid the charm on using pressure from my thumb and my other hand holding the charm to get the charm started on the ring. It sounds more complicated than it sounds.

This is where needle nose pliers come in handy. Use them to twist the ring around until the charm is completely hooked onto the split ring. 

Ta-da!

I didn't get a picture of the quotes before I stuck the epoxy stickers on it and started cutting. But you get the idea. I printed these on my own printer on some old photo paper I had. If you have the resources, I would suggest getting these printed at a photo place. These turned out great, but they could have been more black and printed on better paper. 

I didn't have the right size circle punch so I put the stickers on over the quote and cut them out around the stickers. 

The bottle caps came with split rings already attached thanks to the entire kit I got for the bottle caps, ball chain, and stickers. 

I used regular Elmer's glue to attach the quote to the bottle caps. I highly suggest NOT doing this. It turned the black on the quote a different color (grayish-blue) and it didn't really even keep the quote attached. My suggestions would be to try either strong scrapbooking tape or regular double sided tape. If you try it, let me know what worked best for you.

Making progress!

I didn't get a picture of the string of beads before I took them apart, but there were large beads, small beads, and silver beads. The original had caps that were pretty cute, and I did see them at Wal-mart, but opted to use these instead.

These are the head and eye pins I used. I have to be honest, I had no clue what these were until I looked for them in the jewelry section.

There are two different types of pins in this package. Flat headed ones, and eye hole ones. I used the flat head ones because they fit the best with the beads I was using. Either one would look good.

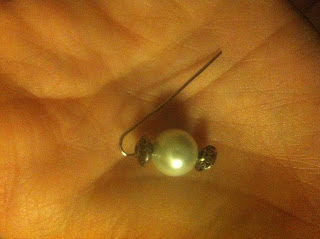
These are the beads I decided to use: the large bead and two silver ones.

On a flat head pin put the silver bead, the big bead, and then another silver one. Or whatever combo you like.

Slide the beads all the way down and create a hook . You are beginning to create a circle that you will hold the beads to the ball chain. It looks like a fish hook earring. I did use the needle nose pliers for this part too. It made it very easy.

Finish your circle, making sure that your "eye" is big enough to put on your ball chain.

Wrap the remainder of the pin around the bottom of the "eye" circle you made.

Another part finished!

The last step is the best one! Slide all of your elements onto your ball chain and relish in the fact that you made it. Or if you are making these for a crowd, that you finished them all! 

I hope the girls like them and they are a reminder to stand for what they believe in.

Sunday, March 17, 2013

2nd Grade Reading Unit

During my student teaching I had to complete a large unit. I chose to compile a reading unit based on the new common core standards. I spoke with my supervising teacher and together we came up with one main common core standard that was not covered in the curriculum currently used in the classroom.
Second Grade Literature: "Recount stories, including fables and folktales from diverse cultures, and determine their central message, lesson, or moral."

I started off by reading several fables and folktales to the students. With each one, we discussed specifics such as characters, setting, beginning, problem, solution, and moral. For one we focused on the beginning, middle, and end. The students created a flipchart where they could flip open the first flap and draw a picture of the beginning, then move to the middle, and the end. For another one, we focused on the problem and the conclusion. Finally, I read three stories to the students and we filled out their own charts like the one below.

Title & Author
Characters & Character Traits
Setting
Beginning
Problem
Solution
Moral
Comparison


I focused on Little Red Riding Hood. The variations were Lon Po Po  by Ed Young, Betsy Red Hoodie by Gail Carson Levine, and Petite Rouge by Mike Artell. Petite Rouge was my favorite because I read it with a southern bayou type accent. The kids loved it and asked me many times to talk with an accent throughout my student teaching. 

When we were done discussing and comparing the different variations, we made a huge class chart that we got to hang in the hall for parent/teacher conferences. 


After the class chart, the students were given another individual chart that looked exactly like the one above, but it only had one row. The students were to fill their chart out with ideas to begin writing their own stories. Once the chart was done, they used it to write their rough drafts, they used partners to help edit and revise their stories, and then they published them. They were so proud. Unfortunately, I had to leave before they were all finished. However, I had a great master teacher who invited me back when the students had completed their illustrations. I got to hear each of them read their own story and see their creativity shine. It was a very proud moment for a silly student teacher.

This was so much fun, I will most definitely be doing this kind of thing again when I get into my own classroom.

Friday, March 15, 2013

YW Challenges

For those who are looking for young women teaching ideas, here is how our branch does our lessons to go with the new curriculum.

Because the curriculum is so focused on living the principles taught and really getting it in the girls' lives and out in the world, we wanted to really incorporate a weekly challenge that had to do with each week's lesson.

We bought hooks that are attached to suction cups so the girls could hang their weekly challenge on the hooks. We asked the girls to put the hooks on their mirror at home so that every time they looked in the mirror, they would see the challenge and hopefully be more likely to complete the it.

At the beginning of each lesson, we try (notice I say try, this is new for us too!) to ask the girls how their challenge went the previous week and how the concepts we talked about in the previous lesson helped them throughout the week.

So far, it is working well. At the beginning it was hard for the girls to get in the habit of taking the handouts/challenges out of their scripture bags, but I think it is going well now.

This challenge is for the March lessons on the Atonement. It goes with the signs I made here. I used the pattern from the bottom of the quote used that found here. I found the flourish by typing in "orange flourish" in a google search. I copied and pasted it into word and changed to color to match the striped pattern.


I want the girls to write a trial or two in their lives and then throughout the lesson come up with a way to overcome that challenge through the atonement of Christ. Throughout the week, they will hopefully see these and be able to overcome one of their own trials or at least begin to work towards overcoming a trial.