Saturday, December 29, 2012

Ball Ornament Wreath

I'm on a roll! When I go back to work I won't have this time to write a post every day. Better enjoy it while I can. 

So, I started this project during garage sale time in the summer. I saw several pinterest ideas for how to make your own Christmas ornament wreath. But because my husband doesn't like the ball ornaments I did not have any. I started looking around thrift stores for good deals, but nothing caught my eye for a low enough price. During garage sale-ing one weekend I came across bags of ornaments for $.25 each. Jackpot! 

One night, while my husband was working graveyard shift, I decided to put in a good movie and try to make this thing in bed. DO NOT TRY THIS! There was glitter EVERYWHERE! My husband kept asking why there was glitter on the bed, the floor, his clothes (since this is where I fold our laundry), and his pillow which inadvertently ended up making his face all sparkly. Imagine a big, tough, burly correctional officer going into a prison with some pretty glitter on his face, hair, boots, uniform, and handcuffs. Makes me laugh every time! Ah-hum, not funny, not funny...

There was glitter all over for a good month, no matter how often I washed those sheets. In addition, I did not think it was necessary to glue the little metal tops to the actual balls. I don't know why I did not think this step was necessary. I guess I just wanted a shortcut. I should know by now that shortcuts are not a good thing usually... Read my other posts to learn how I like to try shortcuts and usually make more work for myself. 

So, about three months after my first try. I decided to get this thing done and do it right. My supplies: a hot glue gun, a wire hanger, and about 40 ball ornaments or more. 


First thing you will want to do is glue those metal things onto the balls. It is time consuming and a pain, but trust me, it is so worth it and pretty much a must--unless you enjoy having to try to connect 40 ornaments back onto the wreath over and over again.  

Next, slide the ornaments onto the wire hanger in any order that pleases your fancy. Then, twist the hanger a few times to secure the ornaments. 

Finally, tie a pretty bow on your wreath. I tied mine so that it covered the twisted wire. I should have used more ornaments. My wreath is a small one, but it's cute nonetheless. 


Friday, December 28, 2012

Finger Paint Kit

Along with our own homemade Christmas, we hand made gifts for our friends too. This is a finger painting kit complete with t-shirt aprons, homemade finger paint, and a container to hold it all. 

Obviously, I used some old baby food jars to hold the finger paint. I found this recipe on Pinterest. My hubby likes to decorate cakes so we have Wilson food dyes that I used instead of the liquid kind you find at the grocery store. There seems to be more color choices with the Wilson dyes. I think I cooked mine a little too long (which if you know me or have read any of my previous cooking posts, you know that this is not surprising at all). There were a few chunks that were hard to get rid of, so make sure you stay by the finger paint the entire time you are cooking it. And stir it frequently. 

I wanted to add aprons for the kids. I found this site with an easy t-shirt apron tutorial. It was really easy. I made 3 aprons in about 20-30 minutes.

I used an old oat box. I had my own kids finger paint some cut-to-size paper. Once dried, I glued it to the oat container. Then I used my Sizzix to cut out letters for the top. Inside were 5 jars of finger paint: purple, yellow, blue, green, and red, 3 kid friendly aprons, and a stack of plain white scrapbook paper.  

This was a fun project and I hope the kids who received it enjoyed it as much as my kids enjoyed helping to make it.

Thursday, December 27, 2012

Spunky: Our Elf

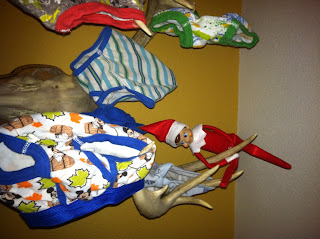
I know I have heard mixed feelings about Elf on the Shelf, but our family just started this tradition. I think that it added excitement to each day of December leading up to Christmas. The kiddos had a blast looking for Spunky our elf each morning. They even got a kick out of when he would find his way back onto his shelf. These are some of the things we woke up to in the morning.


This was pretty fun. We turned on the fan and Spunky was swinging around in the air.


Put a spot of red on each kid's nose. My son wiped the first try off right away so he had a red streak on his hand in the morning as well as red on his nose. All of them knew there was something on their nose and was picking at it before they had a chance to see it in the mirror. 

In the bathroom sink.


This snowman dances around. The kids knew not to touch Spunky, but they liked watching him dance around.

One of my favorites. Each deer got a different kids' [clean ;)] undies. 

I love how he is positioned.

He made a snow angel out of flour on our kitchen table. See the footprints.

He was fun to have this holiday season. My middle girlie keeps asking when he can come back. Hopefully next year when he comes back he will be a little less mischievous... or not! :)

Sunday, December 23, 2012

Date Night Gift

So, my internet service has suddenly started acting strange and oddly slow. The pages will time out before I can even open any websites. This has made blogging insanely difficult. Hopefully soon, we will get this fixed! It is driving me crazy! (Side note: I have tried to post this thing 15 times no-not even kidding- with no luck! UGH!!!)

But in the meantime, I've been able to get ALL, yes all, of my Christmas gifts completed and all the baking done. Christmas we are ready for you! Now, I just have to wait for the internet to kick it up so I can give you post after post after post after post of the awesome things I tried out the past few months. Hopefully soon.

As mentioned earlier, my hubby and I decided on a homemade Christmas this year since I was student teaching this fall without income. 

This gift is for my husband. I got the idea from Shannon Brown. This past year we wanted to try having a date night each month. We were lucky if we got 4 kidless dates in the whole year (not including the times Grandma and Grandpa watched the kiddos so Mom and Dad could get some grocery shopping done quickly). This year, I decided we should do better; so for his gift, I created a year's worth of preplanned, prepaid dates. Each envelope comes with a note that explains the date idea for that month. Everything that is needed for the date is included in the envelope. For example...


This is January. In it is a stay at home spa date. My hubby isn't a girly man at all. But, he has rough feet so I have some things scrub his feet. I also added some lotion for a back rub or two.


I added a movie gift certificate and a gift card to his favorite restaurant. 


Sorry, about this picture. For his birthday month I wanted him to really enjoy our date. We both like fishing and the time is about right to do so. I liked the note I wrote for this one if you can make it out with the blur. For activities like this one, I included a gift certificate to a place we can get some bait and cash for babysitting.


I also added activities we rarely ever do like bowling. (Thanks Heather)

I live in a tiny tiny tiny community where my options for activities are limited. I would have loved to include things like rock climbing and laser tag or paintball (since I've never done it), but those options are just not available to us. Many of the dates I did choose are little or no cost and include things I have around the house. You could go all out or keep it simple. I wanted to make sure I do plenty of activities that he likes so the few mildly girly ones, he would be okay with. The whole idea was to create something so that we are not sitting at home saying, "We should go out." "What should we do?" "I don't know." "Who will watch our kids?" "That takes too long." "We don't have money." etc, etc, etc. for about 2 hours and then its too late to go anywhere or do anything or plan anything. 

If you choose to attempt this, I highly suggest starting with plenty of time to get it done. It took me about a month to round up all the gift certificates and find out what activities were around that we could do. Don't forget the babysitting money or money for food or little extras. 

Here is my list of activities. I also needed to make myself a list of items to get to make sure I got enough of everything for each envelope.

January- Spas Date at Home: Lotion included
February- Bowling: Gift card + $20 for food
March- Sleepover for 2: 2 new movies (so he can have a choice) + a microwave popcorn packet.
April- Dinner & Movie: Gift certificates
May- Special at home date: Sorry, details kept to myself :)
June- Fishing: Gift certificate for bait + babysitting money
July- Game Night (with or without others): Deck of cards
August- Kitchen Date: Recipe
September- Goose hunting: This was a last minute one that I can't remember what I put in. Probably babysitting money
October- Double/Triple Date: Cash to spend doing whatever our group decides
November- Deer Hunting (if we get drawn this year): Gift card to a place to buy shells + money for babysitting
December- Shopping Challenge: Mini stockings with $5 to find something to fill the mini stockings with in 15 minutes or less + cash for some food. We will give these to each other at Christmas.

Here's how it works: I put all these in a box that he will open on Christmas day. The first thing he sees (I took a picture, but because of my fabulous internet connection it took over an hour to attempt to upload the one picture, and by that time, I'd had it.) is a note that explains the whole thing. In the note I give him the rules which are simple. At the beginning of each month we will open the envelope, set a date, arrange for babysitting if necessary, and await the fun times together. The second rule: NO PEEKING! I did not seal the envelopes because I still have a few things I want to add, but they are not out yet (next year's hunting season dates and times) or did not fit well.

I hope he likes it!


Friday, December 7, 2012

Banana

Okay, this isn't the best, but it will work well for my kiddos. They have been asking for food for their play kitchen. Actually, when my oldest was asked what she wanted for Christmas by some friends, she simply said, "Food. I'd like some food." With stunned expressions, I'm sure, they looked at my youngest daughter who clarified, "Play food for our kitchen." So, here is the start of giving my kids food for Christmas.

Felt Banana


Like I said, it's not the best but it will work to play with. Stay tuned for more felt food. They get better, I promise. 


Wednesday, December 5, 2012

Thanksgiving 2012

On my holiday to-do list were several Thanksgiving things. My family and I got most of them done and had a wonderful Thanksgiving with my in-laws. Here is a synopsis of our wonderful holiday according to the list I posted earlier.

Name card project:
When I was young my mom and I would often go to my grandparents house for holidays. We would make gum drop turkeys for Thanksgiving. I wanted to keep this tradition going so we made those and put name tags in them.

We took those gummy fruit slices and used them for the base. Cut toothpicks in half and stuck them into the fruit slices.  Then we added the gum drops on top of the toothpicks. What really made these was when my hubby took the "head" and put it sideways. Before that they looked pretty silly. 
I had my oldest girl who is learning to write in school write the names of everyone who would be there. We put them on top of the turkeys. They turned out so cute.

Turkey Marinade:
So, so good! I would highly recommend it. I have never made a turkey that was so moist! It was actually done an hour before I thought and rested with tin foil over it for the remainder of the time and it was still amazing! Here is the link where you will find the recipe. I just used allspice instead of the Asian spice stuff.

Activity for Thanksgiving Day:
In addition to the gum drop turkeys, we made turkey cups to fill with ranch and sliced veggies.

Hubby was having fun with them before we filled them.


This one was mine, and the tail feathers were not as long as the others so this one looks a little funny, but the rest looked pretty cute.

Pumpkin Pie:

I have used this recipe for several years now and have never had a problem with it. I tried it with regular jack-o-lantern pumpkins for the first time this year and they turned out great; well to be honest, 5 out of the 9 I made this fall are great. We haven't eaten the other 4. They are freezing for another time. We are pumpkin pied out for the moment.

I hope someone out there can use something in here... :)

    Thursday, November 15, 2012

    Girl's Apron

    My first Christmas gift is made! Yay me :) This year we are doing a homemade Christmas because I have been student teaching the past 12 weeks, and with only one income, we are needing to be a bit scrappy. So, all my wonderful (at least in my mind) ideas and projects will become part of your viewing pleasure... Lucky you! :)

    My first project was a child's apron. I got the original idea from this pinterest idea. However, I didn't find the cutsie potholder. The ones I saw were all mellow and clam and just not quite right for a little girl's apron. Apparently these shoppers don't like the cute girlie potholders in their kitchens... So, I settled for two plain dish towels in a pretty purple color-little girl's favorite color. 

    Please keep in mind that I am not a professional seamstress. I just get by...

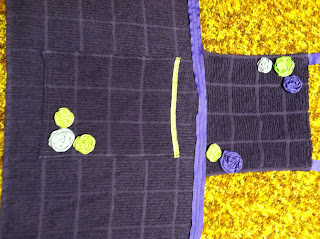
    As you can see, my lighting is not so good. Sorry, but my phone is the best camera I have.  The color is closer to the picture on the right. We also have the most lovely 70's colored carpet in our basement. Yes, we have to deal with that everyday, so you will have to too. Sorry. The left picture is what I started with times two. The picture on the right is what I cut in half for the top half of the apron.


    I started with the top half of the apron. I folded it and sewed it to the size I wanted, making sure I sewed up the sides I had just cut to ensure no fraying would take place. You certainly don't have to, but I lined up those spaces/lines that are on many terry cloth dish towels. I wanted to make it easy and for me, and sewing on a pre made line was easier than trying to get a straight line any other way. As you can see, I lined up the foot of the sewing machine to the already there line. Yay for easy!

                                         
    Then I added some ribbon to tie around the neck. I simply sewed it into the fold on the back of the towel. 


    If anyone really knows me, they would know that I goof up on things quite often, like this... I sewed the ribbon for the neck to the front of the apron top. I'm such a genius! So, if you make this or any sewing project for that matter, make sure you don't do what I did. Learn from my mistakes. 

    As I sat there wondering what I wanted to do I contemplated a seem ripper, but those stitches were TINY. I figured I would just cut it off and fix it later. You will see how in a minute or two, depending on how fast you read this turing-out-to-be-quite-lengthy-post.


    Walah! Finished with my apron top with my little ribbon mishap clearly there.

    Now for the bottom half...


    I had extra towel fabric that I did not want to waste, so I decided to add a pocket. Again, I wanted to match up the lines as best as I could. Clearly, I did great on the vertical lines; not so great on the horizontal lines. It's okay, it's only a simply project for my daughter. Besides, it kinda stands out this way.
    I sewed the pocket edges under, again, using the already there lines to make it easy.


    I wanted the pocket to stand out a bit, so I added a little green ribbon to the top of the pocket. Luckily for me, I was thinking this time and added the ribbon before I sewed the pocket to the apron part.


    The next step is to add the two halves together. I centered the top half with the bottom half, and then turned the top half upside down over the bottom; sewed the two together and had something that finally resembled an apron.


    I wanted to add a ribbon around the waste as a way to tie the apron in the back. I centered the ribbon and pinned it. Then simply sewed it on. This was probably the most difficult part of the project because I wanted to make sure I had the ribbon covering the bottom half all the way across, as well as coving the top half just part of the way. It sounds confusing, but it really isn't that bad, and it really wasn't that hard.


    Finished apron sans embellishments. If you look at the original that sparked my creativity (ha!) it has a cute little pattern on the potholder and the towel. I knew I wanted to add something to my plain apron. I also needed a way to hide the ribbon mess-up on top. 

    Thus enter ribbon flowers...


    Start with a felt circle and a knot tied at the end of the ribbon. 

    Begin twisting and wrapping the ribbon around the knot hot glueing as you go. I'm sure you can use some other type of glue, but hot glue was easy and quick for me. Be sure the you are twisting the same way each time. With this flower I was twisting out. 


    This flower I was twisting in. Once you do a couple of these, it becomes really easy and they actually look better the more you do. Hum, imagine that, getting better with practice. You know, my mother told me that would be the case with my piano practicing as a kid. Why I didn't believe her, I'm not quite sure. Now trying to instill that in my own kids is probably as hard as it was for my mother. Sorry mom!


    Again, I was twisting in with this one. I found that twisting in was easier for me, but give it a shot and see what works for you. Continue twisting and gluing until you have covered the felt or run out of ribbon. Tuck the end of the ribbon under and glue to the bottom of the flower. If you have extra felt showing, just trim it away.

    All my flowers. I think they turned out so cute!

    Remember how I said that hot glue was quick and easy for me? Well it was, but it came with a cost. Ouch! I burned myself several times and finally realized that if I left it on my thumb I didn't burn it as badly. Instead, I collected a nice little glob of dried hot glue on my thumb. 

    Last step. Organize and reorganize the flowers on the apron until you are satisfied with their positions. Here is how mine turned out.


    Remember that ribbon mess up? Yah, can you see it now?

    No one will ever know. Except for the fact that I just told the world... 


    I wanted to post a shot with the apron on, but because I didn't want to show my little girl, I used a stand in while the girls were at school. Thanks little man! It's quite big on him, but it will work well for my little girl. 

    Yay, one gift down several to go.